Friday 27 June 2014

Make Fun Summer Hats Collage - Tutorial!

Fun Summer Hats Collage!

This week we decided to celebrate Summer (at last!) by making some Fun Summer Hats Collages. 

Easy for any age or ability and some striking results - quite the thing for Ascot we believe!!

What you will need...

A4 sheets white printer paper

Decorative paper / thin card for hat

Embellishments - cutouts of flowers, butterflies,  buttons, ribbons, bows - these can also be the kind you stick on gift parcels - glitter and anything else you have on hand...

Glue sticks (any glue really, but the sticks are less messy and dry quickly)

Double sided adhesive pads to attach bows etc

A4 sheet of card to glue the finished hat onto

How to make it...

Print out the Hat Template

Turn your print over and draw the same shape on the other side of your paper.
 

Easy way to do this is, is to hold it against a window so you can see see through the paper...

Now work on this side (your drawn hat outline) 


Cut strips/shapes (whatever you want) of decorative paper/thin card and glue them across the hat shape - overlap each piece and go over the edges of the hat shape line.


When this has dried, turn your paper over and cut out your hat from the shape on the back of your sheet.


Now the fun part ...Add your embellishments...Buttons, bows, flowers, ribbons, glitter etc


Here are some Flower Templates you can use 

When you are happy with your hat, stick it onto an A4 sheet of card, at a jaunty angle and stick something in the corner to finish it off!


And here are some of our hats we made at Mencap...


 Have fun with your group as we celebrate Summer!


Sunday 15 June 2014

Our South African Wall Mural is finished...


Our South African Wall Mural at Mencap, Braintree is now complete...


The super-imposed flag on the map of SA was created by glueing on small screwed-up pieces of tissue paper and the ocean using flat sheets of tissue. 

Our class loved choosing and colouring-in the animals and of course Nelson Mandela had to be included - plus Rugby!

To complete the frame we strung coloured pasta "beads" in loops down the sides and across the bottom edge. 

Having just returned from a trip over there, I can say that South Africa is a beautiful, vibrant country with friendly people and so much to see and enjoy...
Thank you South Africa!

Monday 2 June 2014

Felt Owls and Hearts for Fund Raising - Tutorials


As we are always looking at ways to raise funds for Mencap, I have been working on some craft and sewing that we can sell. 

If you would like to make some of the same, I have put together a tutorial.

Felt Owl

You will need...

Felt - main colour 
(2 pieces) is 14 x 13cms

Felt - Scraps of other colours for wings etc

Googly eyes (or buttons)

Ribbon - 40cms

Glue

Embroidery thread

Batting/Wadding - approx 13 x 12cms

How to make...

Cut out your felt pieces as per the pattern
 
Felt Owl Pattern      
Plus a triangle of felt for the beak (not on the pattern)

Take one of the main pieces and attach the wings, 
leaving about 1/2 cm of body showing on the edges as per below. 

Use 3 strands of embroidery thread and a  simple running stitch


 Stitch on the black eye "mask" and the the two circular eye patches. 

For the patches I used blanket stitch. 

Stitch the "feathers" between the wings. (see on final photo)


Cut your batting in the same shape as you body 

but about 1cm smaller all round.


Attach the back to the front body using blanket stitch 

and at the same time 

stitch in the folded piece of ribbon, between the ears.

Glue on the Googly eyes (or buttons) and glue on the felt beak

_______________________________________


Felt Hearts

You will need...

Felt - main colour (2 pieces) is 15 x 15cms

Felt pieces - buttons - bows - embellishments  to decorate.

Ribbon - 28cms

Batting / Wadding approx 14 x 14cms


How to make...

Cut out two felt hearts from pattern
 
Heart Template

Decorate one heart with felt flower, buttons, bows or any other bling.

Cut batting in heart shape, but about 1cm  smaller all round and lay on back heart and put front heart on top.

Stitch around edge (I machine stitched, but can be done by hand if preferred) catching a loop of ribbon into centre top.  

Trim with pinking shears for a zigzag edge if so desired!

Hope these felt crafts help you make some funds for your group...


Saturday 31 May 2014

Some Easy Card Fridge Magnets

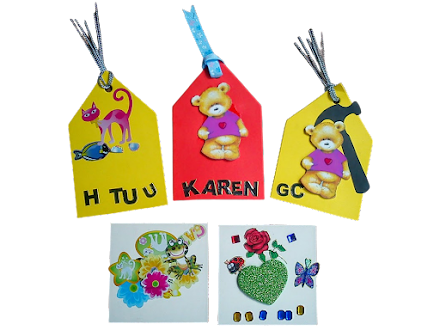
Card fridge magnets
Card Fridge Magnets

We made Card Fridge Magnets at Mencap this week - the square boards are pieces of a floor jigsaw puzzle - we just turned them over and worked on the white backs!

The coloured card we shaped into "Labels" and punched a hole centre top.

After decorating with stickers and bling we finished some with a name, initials and a ribbon.

On the other side of the card, we stuck strips of self-adhesive magnetic tape (we got ours from eBay) and they were ready to be popped onto the fridge for everyone to enjoy!

Try making yours!

We are also making a new Wall Mural - this time on the theme - South Africa!  Having just been there for a short holiday, visiting family, it seemed a good idea to bring some sunshine back to UK! 

So watch this Blog - will be finished in a few weeks time...

children in sea in South Africa
Children in South Africa enjoying paddling!