Showing posts with label craft. Show all posts

Friday 15 March 2024

Face Cloth Easter Bunnies! Easy and Fun!

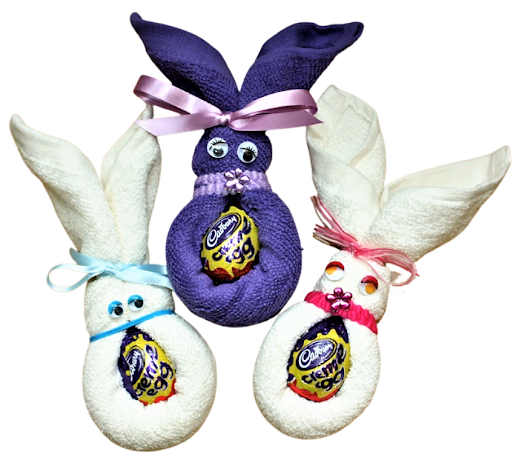
Face-Cloth Easter Bunnies
It's three years since I posted a tutorial on making up these Face Cloth Easter Bunnies! See it Here

We have made some again this year, to raise some funds for our Mencap Arts and Crafts group and instead of using ribbon around the middle bit, we have used elasticated hair bands. 

These cost less than ribbon (we bought a card of 20 for £1) and are very easy to use....And we think they make a pretty belt! 

For the Boy ones we used plain hair bands as you can see in the photo above.
Face-Cloth Easter Bunnies

So have fun making your Easter Bunnies - they make lovely gifts 
and with a face cloth to keep after the Easter Eggs have all been devoured!

Face-Cloth Easter Bunnies

...or like us you can use them to make some funds for your group!

Sunday 4 December 2022

Printable Santa Template - For Tree Hangings - Tutorial

Printable Santa Template - Tree Hangings!
If you want to make your own Santas - here is the link to download and print the Santa Template - print straight onto thin card if you can and then colour-in and cut out the six parts. 

Attach the arms and legs with paper clips (Brads) and then glue a flat lolly stick behing the body, with about an inch sticking out at the top. 

Attach Santa's head to this with a double-sided sticky pad. 

Add a loop and hang him on the Christmas Tree! 

Cotton wool beards and glitter can be added if so desired!
Printable Santa Template - Tree Hangings!

Craft at Mencap Braintree - with Christmas Carols, Tea and Donuts!


Click on the Christmas button above to find all the other Christmas Craft on my Blog...

Friday 4 December 2015

Christmas Bunting - Printable Templates!

Felt Christmas Bunting

A simple string of Christmas Bunting - can be made out of felt, as above, but will also be just as effective cut out of card. Mine has just five shapes, but you can make the String of Christmas bunting as long as you wish, using a mixture of the shapes or just choose one or two of them...

You will need...
Felt sheets or Card

Buttons and other embellishments

Tacky Glue

String, ribbon or tape and small craft pegs 


To make...

Print your Template of Christmas Shapes

Cut out the shapes - in felt or card

Decorate with embellishments / buttons, using fabric or tacky glue and leave to dry

Peg the shapes onto your string and hang them up...

Enjoy this exciting time of the year - have fun preparing for the Festive Season...!!

Tuesday 10 November 2015

Paper Lanterns - Tutorial...!


I'm sure most of you have made these Paper Lanterns at some time in your life - either as a child or with your own children - but in case you need a brush-up here is a good tutorial...

First Pallette

Diwali - an ancient Hindu festival, known as "The Festival of Lights" is celebrated this week and these lanterns are also great for Christmas decorations too...

We used thin card for the Lanterns and decorated them with glitter, stickers, ribbon, lace and shiny confetti, but you can use anything you have, that will enhance these colourful Lanterns.


Enjoy making your lanterns....!

Saturday 24 October 2015

Spider Halloween Headbands!

Halloween Headband Spider

We had a lovely afternoon at Mencap making our creepy, crawly, scary, colourful Spider Halloween Headbands...

Using ready-made spiders, flowers, feathers, organza bits and ribbons we attached a elastic headband - using plastic coated ties and lots of black sticky electrical tape to secure the embellishments...


The girls will be wearing them to the Braintree Mencap Halloween party!


Monday 5 October 2015

My Blog is now User-Friendly! Eight new Craft and Quiz Menu Buttons...


After five years of posting Craft and Quizzes onto my Blog, I felt it was time to make it more User-friendly...

I have added eight new pages - each one containing a list of links to the Tutorials in my Blog.

Each page has a button in the Menu above - so do have a browse and see what you fancy having a look at...

Thanks to all my visitors - do hope you find my Blog helpful in finding suitable Craft and Quizzes for your groups, yourself and your families...


Friday 2 October 2015

Pop Up Books Monsters and Frozen - a lot of fun and easy to do craft - Tutorial!

 Monster Pop Up Book 


Frozen Pop Up Book


 When we say we made Monsters and Frozen "Pop Up Books" at Mencap Art and Craft Group, we actually made one Pop Up page in our Project Books. These books are carried through the year and added to, with different themes - many relating to the seasons and holidays in the calendar year. 

What you will need -

Either, like us, an A4 book with good quality art paper or you can just fold an A3 sheet of card in half and use that...

Glue stick

Colouring in pens

A4 sheet of thin card to make the Pop Up facility - to make this, look at this excellent tutorial...

Extreme Paper Crafting - Pop up basics  (Follow Tutorial 1 The Box)

If you want to use my Frozen or Monsters prints, here is the link

Monsters Pop Up

Frozen Pop Up

or you can use you own pictures - do check the sizes as they need to be within the page when the book or card is closed...

How to make up...

Colour in the pictures

Glue the Pop Up facility into you book or card - make sure you do not glue the bits that Pop Out...

Glue and place your pictures 

Here are some we made...


Sunday 27 September 2015

Mod Podge on Hardback Notebooks - Decorating the cover!


This week, at Mencap, we decided to try our hand at using Mod Podge...!

What you will need...

Deciding that working on a flat surface was the best choice for a first attempt, we bought some A5 Hardback Notebooks.

A Bottle of Mod Podge Gloss 

Some Sponge "Brushes"Image result for sponge brush

We decided to use some fairy and woodland cutouts we had and some craft paper that we use for backing paper, on greeting cards. 

(Mod Podge works best on fairly thick paper we found - sheets of thin paper wrinkled a lot - sometimes this is a desired effect, but not for our project)  

How to do it...

We found Mod Podge Rocks a very useful site, with loads of tutorials - here is the link...explains how to use Mod Podge far better than I can!

 Learn How to Use Mod Podge

So enjoy using this wonderful product - don't worry if it looks white and patchy when you finish your work - by the next day it will have dried clear and bright - very rewarding! 


Tuesday 12 May 2015

Wall Hanging to Celebrate Mencap 60th Anniversary

Wall Hanging - Fabric

As Mencap is celebrating its 60th Anniversary, we decided to make a crafty Wall Hanging at our Art and Craft group.

First we made the woven "squares" using the cardboard loom method.


Then next we made some felt flowers like this 

Easy Button Felt Flowers

The "60" I found on eBay

The straps we made from strips cut from an old T Shirt, plaited with lengths of coloured wool, to brighten the grey.

The material was in the 20p box at the local charity shop

After stitching on the squares and the 60 (on my sewing machine) we attached the flowers with little gold safety pins. 

Folded the material up to make a "Cushion" which we filled with toy stuffing.

Attached the straps and there it is - bright and bold and made with such pleasure...!

Monday 29 December 2014

New Year A4 Posters - Printable Colouring In

Ease into 2015 with some A4 Posters

ready for you to print and colour-in 

with your family or groups. 

2015 Dog

2015 Flowers

2015 Crinoline

Thanks to Raising Our Kids for sharing their free pictures, two of which I have used in the posters.

May the New Year bring Peace to our world
 - after all, it is the only one we have...


Friday 27 June 2014

Make Fun Summer Hats Collage - Tutorial!

Fun Summer Hats Collage!

This week we decided to celebrate Summer (at last!) by making some Fun Summer Hats Collages. 

Easy for any age or ability and some striking results - quite the thing for Ascot we believe!!

What you will need...

A4 sheets white printer paper

Decorative paper / thin card for hat

Embellishments - cutouts of flowers, butterflies,  buttons, ribbons, bows - these can also be the kind you stick on gift parcels - glitter and anything else you have on hand...

Glue sticks (any glue really, but the sticks are less messy and dry quickly)

Double sided adhesive pads to attach bows etc

A4 sheet of card to glue the finished hat onto

How to make it...

Print out the Hat Template

Turn your print over and draw the same shape on the other side of your paper.
 

Easy way to do this is, is to hold it against a window so you can see see through the paper...

Now work on this side (your drawn hat outline) 


Cut strips/shapes (whatever you want) of decorative paper/thin card and glue them across the hat shape - overlap each piece and go over the edges of the hat shape line.


When this has dried, turn your paper over and cut out your hat from the shape on the back of your sheet.


Now the fun part ...Add your embellishments...Buttons, bows, flowers, ribbons, glitter etc


Here are some Flower Templates you can use 

When you are happy with your hat, stick it onto an A4 sheet of card, at a jaunty angle and stick something in the corner to finish it off!


And here are some of our hats we made at Mencap...


 Have fun with your group as we celebrate Summer!


Saturday 31 May 2014

Some Easy Card Fridge Magnets

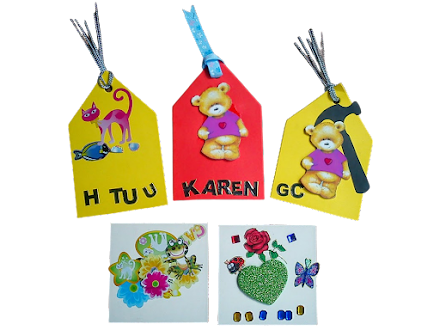
Card fridge magnets
Card Fridge Magnets

We made Card Fridge Magnets at Mencap this week - the square boards are pieces of a floor jigsaw puzzle - we just turned them over and worked on the white backs!

The coloured card we shaped into "Labels" and punched a hole centre top.

After decorating with stickers and bling we finished some with a name, initials and a ribbon.

On the other side of the card, we stuck strips of self-adhesive magnetic tape (we got ours from eBay) and they were ready to be popped onto the fridge for everyone to enjoy!

Try making yours!

We are also making a new Wall Mural - this time on the theme - South Africa!  Having just been there for a short holiday, visiting family, it seemed a good idea to bring some sunshine back to UK! 

So watch this Blog - will be finished in a few weeks time...

children in sea in South Africa
Children in South Africa enjoying paddling!

Saturday 15 March 2014

Easter Bunting to Celebrate Spring! Tutorials!


We made our Easter Bunting using different shapes as well as the traditional triangular flags. The Easter Eggs you see were made following this great tutorial
Paper Strip Easter Egg  by Merrilee.

We also printed bunny pictures (loads to be found on Google) which were coloured-in and stuck on.

Below, the black flags have been decorated with Easter die cuts (found on eBay) and pom poms.

The chicks we bought ready-made and made them a "nest" with two small paper plates. See here how to do this.


For more Easter ideas click on the Easter button at the top of my Blog - have fun with your groups...

Friday 17 January 2014

Butterflies and Flowers Collage in a Vase!


 Following on from making our Collage Calendar, our group made collages of vases of flowers, mounted onto black card. Some were made into calendars by adding a calendar tab and others were just a bright picture to hang on the wall!

Here are some samples of their  creations...


Even the least artistic member of the group will end up with a very pleasing picture - on A4 piece of card - cutting, sticking and enhancing with stickers, buttons, ribbon bows etc 

Have a go with your groups!

Tuesday 31 December 2013

Calendar Collage to make for 2014 - a Tutorial


This Calendar Collage is for any year - so easy to put together and a great deal of fun for your groups. 

It is a good idea to have some sort of theme - mine was based around UK, choosing pictures of different people in our country and of course a little map. To finish off, I cut out words I thought were appropriate to the theme...

Your theme could be food (lots to choose from in most magazines!), animals (wild or maybe pet animals), jewellery, hair styles, fashion (clothes or shoes maybe) or celebrities - there will be many more themes that will come to you as you browse through your magazines. 

You could also just have a colour theme - say purple and yellow or green and red or black and orange - endless choices here!

So you will need...

Magazines (mine were just Sunday newspaper magazines)

Glue

A4 Paper 

A4 Black or other coloured card
 
Calendar Tab for appropriate year 

Ribbon or string (about 15cms)

Putting your Calendar Collage together...

Having got all your cut-outs together, stick them first onto an A4 piece of ordinary paper from your printer. Overlapping them will give you a cleaner finish so decide on the order of sticking, before you start...


Then when dry, cut around your pictures, so no white paper is showing. 

Stick this collage onto an A4 sheet of dark card (I used black) and attach you calendar tab and then add a loop of ribbon or string at the top, for hanging.


Friday 11 October 2013

Wall Mural - Autumn!


Our Art and Craft group at Mencap (Braintree) made this lovely Autumn Wall Mural - inspired by Shaun, our group leader.

Having decided we wanted a lake and a few hills in the Mural, it then followed that we needed to put in Nessie - the Loch Ness Monster...!

So this became a Scottish Autumn Wall Mural complete with Loch Ness, Nessie and don't you love the Sunset!

The whole background is made from torn pieces of coloured tissue paper glued onto large sheets of white paper. (the whole mural is about 4 x 8 foot) the trees were painted on white paper and then cut out and glued on. All the leaves were made by painting real leaves on the underside with poster paint and then pressing them onto white paper and when dry, cutting them out. All the other creatures and footballer (!) were then coloured-in and stuck on as well...

It took us three afternoons to put together but we were thrilled with the result...