Showing posts with label beads. Show all posts

Saturday 13 August 2022

Paper Plate Dream Catcher Tutorial - Easy and fun to make!

These Paper Plate Dream Catchers are great fun to make and easy for any age and ability...

You will need... 

A good quality paper plate -  needs to be rigid enough to keep its shape

A length of Yarn - we Used Cotton Yarn DK - 2.5m plus 2 or 3 pieces for the dangles - each about 40cms long - Also about 30cms to make a tag to hang it.

Beads with large holes - we used Pony Beads

Feathers - dyed ones available at craft shops

Colouring-in pens or paints

Punch to make holes 

Sticky Tape

How to make... 

Cut out the centre of the plate.

Punch holes around the inside hole as per photo - about 2.5cm apart - no need to measure - don't have to accurate!

Working on the "bottom" surface of the plate - colour or paint the decoration - our plates had ridges which added to the effect!

Take your long piece of yarn and secure one end with sticky tape to the inside of the plate.

Thread the yarn through the holes - back and forth - no fixed pattern - just as you like! When about two thirds through, thread some beads onto the yarn (see photo above) 

When all the holes are used up, secure the end again with sticky tape, on the inside of the plate.

Punch a hole centre top and make a loop to hang up your Dream Catcher.

Punch two or three holes along bottom edge for dangles...

Tie a bead about a third of the way down on your yarn - then thread beads onto the longer piece above the tied bead.

Thread the end of this yarn, above the beads, through the punched hole and secure with sticky tape inside the plate.

Repeat with other one or two dangles.

Tie feathers onto the ends of yarn below the beads.

Sweet Dreams!
Nicola with her Dream Catcher

Andy painted his Dream Catcher with Acrylics


Monday 3 October 2016

Memory Wire and Bead Bracelets


Memory Wire and Bead Bracelet Kits
We found these Memory Wire and Bead Bracelet Kits on eBay (they come in a range of colours) - what a great afternoon we had making them up in our Craft Group at Mencap. 

We placed the beads on white poly plates to make them easy to see and to pick up and then threaded them onto the memory wire coil. The best thing is, they fit any size wrist and are just so pretty...  

You do need "jewellery tools" however to make a loop at each end of the wire as it is not possible to bend by hand (this loop stops the beads from falling off, so is essential!)

Here are a couple the girls made...

Kavita  
 
Jenna

Friday 15 January 2016

Funky Washer Necklaces - Tutorial!

Washer necklaces

These simple Washer Necklaces are very easy to put together and our class at Mencap really loved creating their own combinations of colours and designs...

What you need...

Metal washers - an assortment of sizes - look at your hardware shop for these...

Nail varnish - we bought a cheap variety - plain colours and one with sparkles in it.

Yarn or cord or leather strips - we used a cotton/rayon yarn but use any suitable - each strip about 108mm long (43inches)

Pony beads - large hole bead

Blue or White Tack (to mount beads on, when painting)

How to make...

Mount your washer on a lump of Blue or White Tack (to raise it up from your table) and paint the top side and edges with your nail varnish.


When dry, take your yarn (you can use a single piece or two or three lengths of yarn - see photos) and fold in half. 

Thread the rounded end through the washer and loop the ends through so your washer hangs from the centre of your yarn.

Thread on beads and maybe add another washer - see our examples for ideas...


Tie the ends of the yarn together and you are done...


Easy to make and lovely to wear...!


Enjoy the fun of creating these funky Washer Necklaces...!


Friday 16 October 2015

Beady Head Keyrings - Tutorial Wooden Bead & Felt Dolls

Beady Head Keyrings - Tutorial Wooden Bead & Felt Dolls

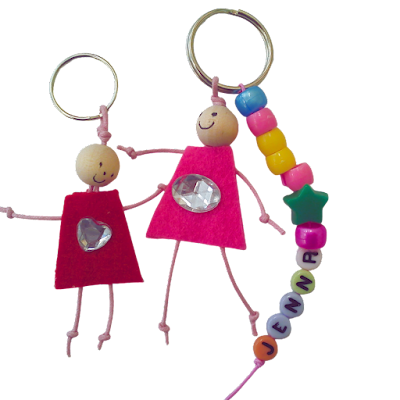
You just must love these little Beady Head Keyrings!


We made them at Mencap this week and even two little boy Beady Heads appeared..
Beady Head Keyrings - Tutorial Wooden Bead & Felt Dolls
We discovered how to make these little fellows by following 
this very good Tutorial...


We used self adhesive felt for the clothes and stuck the buttons and bling on with double side adhesive tape. 


We added a keyring and some of the class made a string of beads to hang alongside.

Have fun making your own Beady Heads!
Beady Head Keyrings - Tutorial Wooden Bead & Felt Dolls

Tuesday 2 June 2015

Stringing Beads - Always Relaxing and Fun!

 We had a Bead Stringing session at Mencap last week - always popular with the girls. 

Here they are showing off their new necklaces...


Watch out for a Keyring Bead tutorial! Coming up soon...

Saturday 26 July 2014

Stringing Beads - a relaxing afternoon!

A big bowl of beads and charms and thread - 
what pleasure there is in stringing beads!

Easy and fun for all ages and abilities - 
we are going to try Loom Bands next...!